If you have an older rose that you wish to duplicate it may be possible to start a new plant by taking a cutting. The technique is not difficult, although some types of roses respond better to this method of propagation than others. Miniature roses are usually successful, and are a good place to learn the technique.
Generally speaking most roses that are sold nowadays have been grafted often using a budding technique. This is done because a hardier more disease resistant rootstock can transfer these benefits to the flowering part of the plant which has been chosen for beautiful flowers or outstanding perfume, but which may not be a robust grower on its own roots. It is a reliable way to propagate roses commercially, but cuttings can also be propagated. The most common rootstock in this area is the ubiquitous 'Dr. Huey' rose which certainly gives vigor but also suckers prolifically, and all too often outgrows the chosen rose to dominate with its red flowers!
If planning to try your hand at propagating from cuttings you must make sure that the parent plant that you are planning to use is not covered by a Plant Patent. These patents are awarded to hybridizers and developers of new varieties in order to protect the tremendous investment that they make in time and money as they bring these varieties to market. Plant patents last for 20 years, and it is illegal to asexually propagate a plant during the period that the patent covers. Rose labels and plant catalogs, including those online, almost always indicate if the cultivar is patented, or if a patent is pending. (It will sometimes say "PPAF" to indicate a patent.)
TO GROW A ROSE FROM A CUTTING YOU WILL NEED:
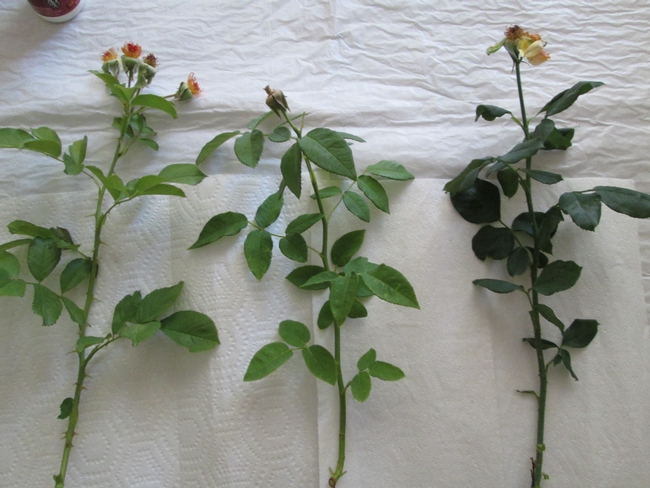
- A well-grown current year's stem that has finished flowering about 8” long for a hybrid tea rose, or 4”-5” for smaller landscape roses. It should be healthy, disease free, green and slightly flexible but not floppy, and should ideally have 4-5 leaf nodes. Place the bottom in water immediately after cutting. Old, woody stems are challenging to root.
- A large, clean pot of moisture retaining compost such as seed starting compost with a good proportion of vermiculite or perlite, or use a loose, commercial soilless potting mix.
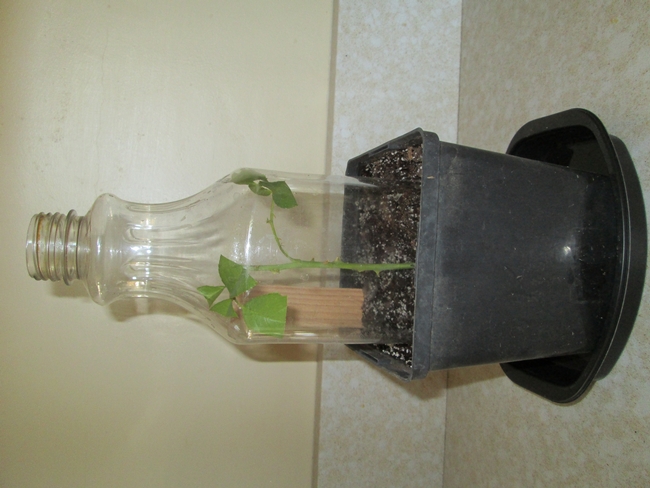
- A cover of some sort to keep a humid environment around the cutting (a two liter soda bottle with the bottom cut out and the cap removed is ideal).
- A sharp knife or sharp pruners – sterilized with alcohol.
- Some rooting hormone. (not essential but produces better results)
- A stick or dibber for making planting holes.
- An area of bright light but out of direct sun. I have a north-facing greenhouse window in my kitchen which is ideal.
- A method of watering.
- Labels for each plant.
Method:
- Fill pot with soil, and water well so that it is evenly moist (but not wet).
- Make a hole in the soil 3”-4” deep and about the diameter of the stem to be planted.
- Put a little rooting hormone in a shallow container such as a jar lid.
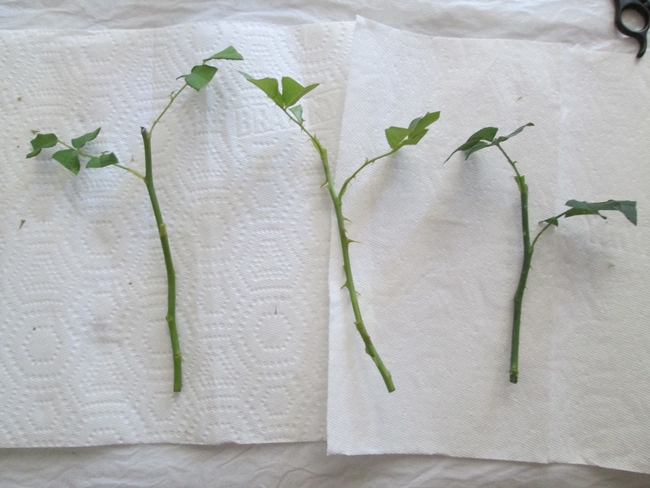
- Prepare cutting material. Cut base of stem straight across just below a node and cut top off at an angle just above the 4th or 5th joint. Remove leaves from the bottom three nodes, but leave some leaves at the top of the stem. If these leaves are large cut them in half to reduce transpiration while the roots are forming.
- Dampen the bottom of the stem in water and dip it into the hormone rooting powder, then carefully place it into the prepared hole burying the bottom two nodes under the soil.
- Firm the soil round the stem.
- Cover with soda bottle without a cap, or place in a plastic bag with the top closed.
- Label with variety if known or description of flower.
- If your soil is well moistened there is no need to water again at this time, so that the rooting hormone does not get washed off.
- From this point on until roots are established it is important to make sure that the cutting does not dry out. I usually water from the bottom, but also keep an eye on the surface moisture.
- Roots may form in about 6 weeks, but more often take about 8 weeks, and once new growth has begun the cover can be removed and care is the same as for any young plant.


In our climate in the Owens Valley I don't plant out the starts until the following spring, but if you have frost protection such as a cold frame and the plants are well grown they may over winter under such cover.
Many years ago an elderly neighbor who had a garden full of roses started them in the fall by digging a trench and putting well-rotted horse manure in the base, then placing a row of cuttings in the trench and back-filling. He had a wonderful success rate but my attempts to emulate this invariably failed. For now I will just stick to the flowerpot method which I know works. Of course there is always the option of sticking the cutting in a potato as touted on the Internet, but I have yet to see any positive results from that method!
https://www.jacksonandperkins.com/how-to-propagate-roses/a/how-to-propagate-roses/
https://www.rosenotes.com/2012/03/dr-huey-you-sucker-you.html
Attached Images:

